
Workflows are the cornerstone of most business operations. It's how employees can collaborate, review, and escalate processes in delivering your business's services promptly. Ensuring not only internal data capture requirements are met, but most importantly, after a job is completed, your customers can be provided with accurate and concise information about the work accomplished. And as the saying goes..."Happy customer, happy life."
So, let's take the first step with a few general scenarios leading swiftly into implementation, followed by a breakdown of available properties for further fine-tuning possibilities.
In this article
- Scenarios
- How to Example
- 2-Step Process
- High-Level Flow
- Detailed Flow
- 2-Step Process
- Properties
- Basic
- Layout & Styling
- Validation & Behaviour
- Advanced Options
Scenarios
- 2-Step Process
A user (1) completes a form and sends it as a task for another user (2) to review (accept/reject).
If the user (2) rejects, the task is returned to the user (1) who submitted it for review.
If the user (2) accepts, the workflow is complete, and a final form submission is uploaded. - 3-Step Process
A user (1) completes a form and sends it as a task for another user (2) to review (accept/reject).
If the user (2) rejects, the task is returned to the user (1) who submitted it for review.
If the user (2) accepts, the form is sent as a task to another user (3) to review (accept/reject).
If the user (3) rejects, the task is returned to the user (2) who submitted it for review.
If the user (3) accepts, the workflow is complete, and a final form submission is uploaded.
How to Example
2-Step Process
High-Level Flow

(Click image to enlarge)
Detailed Flow
- User 1 (Step 0) [Submits]
- User 2 - Reviewer (Step 2) [Rejects]
- User 1 (Step 1) [Resubmits]
- User 2 - Reviewer (Step 2) [Accepts]
The example form, in the images below, can be installed into your account from our Examples Catalog > How Tos > 2-Step Process.User 1 (Step 0)

User 2 - Reviewer (Step 2)

User 1 (Step 1)

User 2 - Reviewer (Step 2)
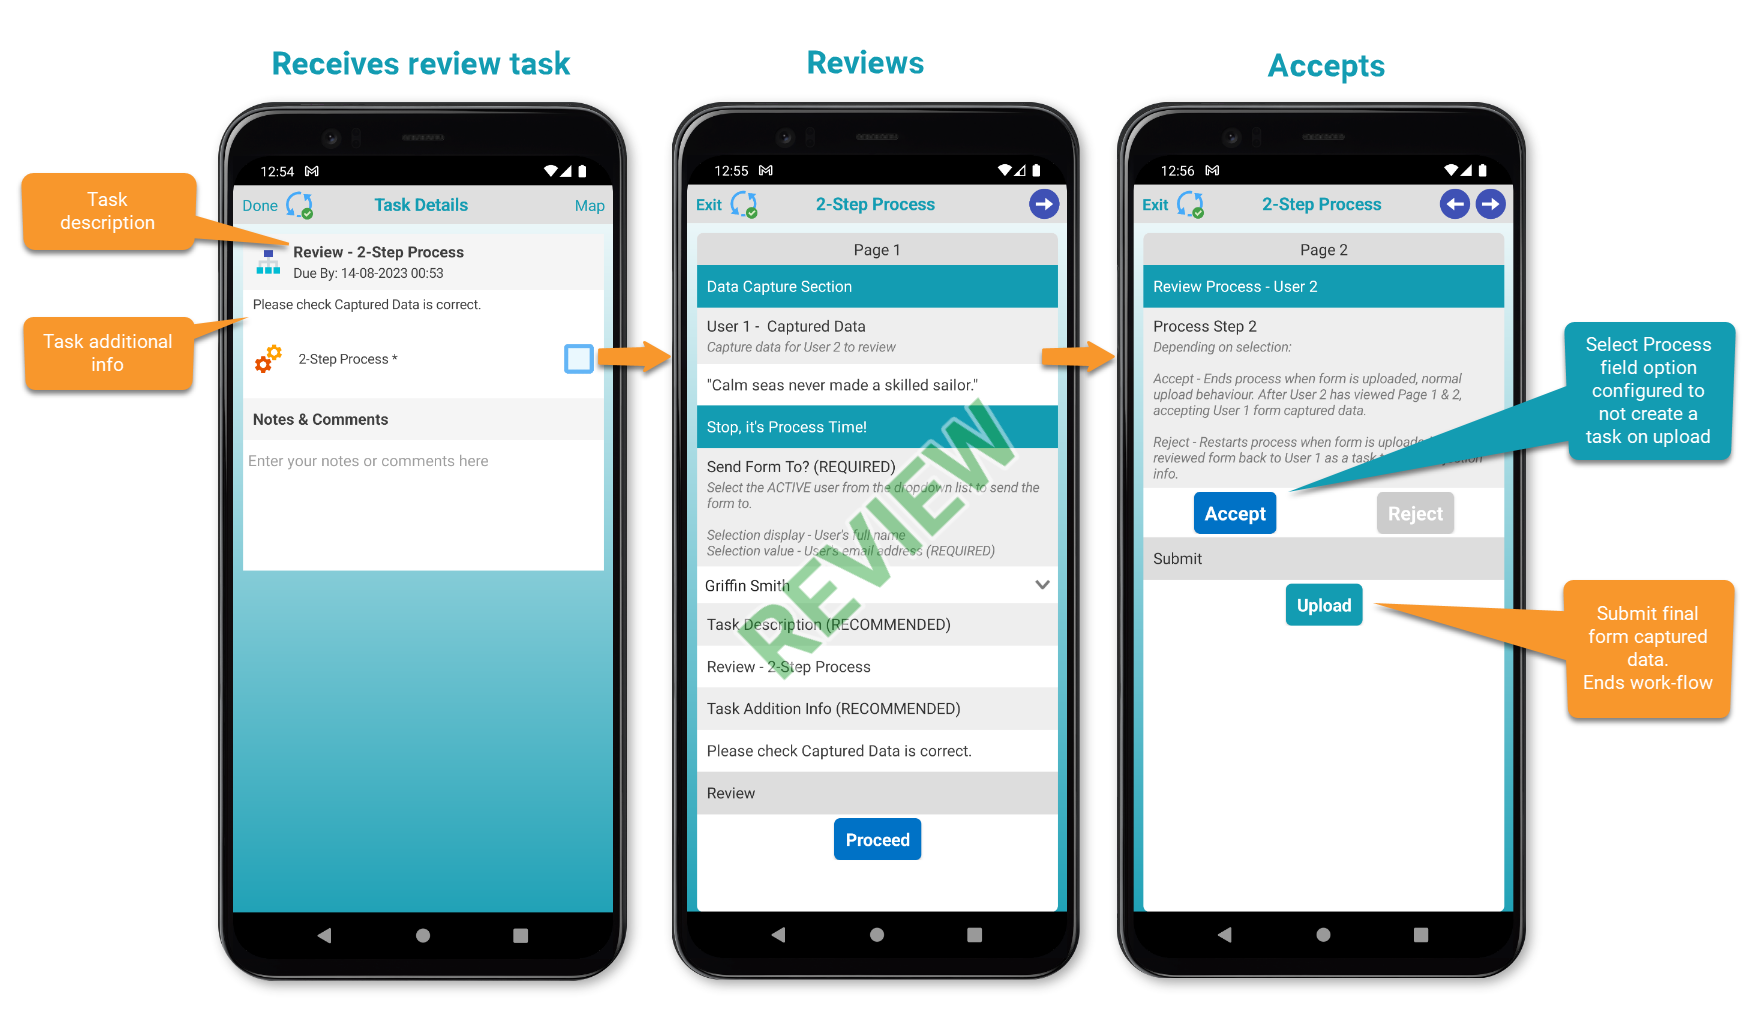
For testing purposes the same active user (Assigned To) can submit and review form captured data, however, for real cases the reviewer is generally another active user.Properties
Basic
- Data Name*
The unique data name of this field.
For example, a field to collect a customer's name might be customer_name.
(Cannot begin with a number, contain spaces, or include special characters.) - Title Text
The field's title text that's shown to the user. - Hint Text
Shows additional help and instruction text. - Result Options*
The app user is presented with up to 3 configurable options/steps/routes to be taken when the form is uploaded. (i.e., Default; Accept, Reject, Escalate)
However, only a single option can be selected.
The option value the user chooses becomes available via the STEP-RESULT() formula function - typically used to unlock other Process Steps in your Form.- Button Colour
Set the color of the button. - Selected Button Color
Set the color the button changes to when selected. - User Interaction
Defines the action to apply when the button is tapped by the user. There are three available options:- Upload Form: This option automates the form submission upon confirming the step. The process is completed with a single user interaction, streamlining workflow efficiency.
- Upload and Print Form: This option automates both the submission and printing upon step confirmation. With a single-user interaction, the system eliminates the need for additional actions.
- Next Process Step* (if any)
If the process moves to another Step in the Form, then you MUST specify the data name of the target Step field - this is required to unlock that field for use.
- Button Colour
*Essential properties—next Process Step data name referenced unlocking additional required and optional Tasks properties for the receiving user, that can be statically or dynamically configured.If no Next Process Step data name is referenced, with the text 'Accept' for example. The user must still select this option and upload the form to end the process/workflow.
If a Next Process Step data name is referenced, the following properties will become available for task customization.
- Send Form To
The app user or users that will receive this Form as a Task for further entry or review.
It can be populated with the target user's email address (as registered on the platform) or a Task assignment identifier that can include a | or separate list.
Examples:- me@example.com
- {{myemailfield}}
- STEP-EMAIL('step1')
- TASK-FIRSTAVAILABLE()
- TASK-FIRSTTOCLAIM()
- TASK-FIRSTTOCLAIM('optionalusergroup')
- TASK-ALLTOCOMPLETE({{myemails}})
- TASK-ALLTOCOMPLETE(‘y@a.b|z@a.b’)
- Task Template
Select a Task Template that will be used to create a new Task when this Process Step is triggered. Also, inheriting the Template's Connectors. Select 'No template - define custom Task' if you wish to define your own Task details instead of using a Task Template. - Complete By (Days)
The number of days allowed to complete the next step. Field references are also allowed. - Task Description
Sets the Task's description as it will appear in the target user's Tasks list that can be statically or dynamically driven
Examples:- CONCAT('Job: ', {{jobcode}}, ' - ', {{status}})
- {{taskDescription}}
- Task Additional Information
Sets additional information on the Task that can be statically or dynamically driven, similar to the Task Description property (above). - Task Location
The coordinates for where the task should be completed. This supports the referencing of other fields and formula functions.
Examples of latitude and longitude from Location field formula functions:- LAT({{gpsfield}})
- LON({{gpsfield}})
- Task Icon
Sets the Task's icon as it will appear in the target user's Tasks list. - User Can Reassign
If checked, the target user can reassign this Task to another person.
This can be useful for cases where an assigned user is sick or too busy or where specific Task activities require another user's involvement.
Layout & Styling
- Background Colour
Set the background color of the title and hint text.
For Horizontal layouts, the background color will also appear under the entry field.
Validation & Behaviour
- Required
Whether this field must be answered before continuing. - Visibility
Control the visibility of this field using a formula.
Advanced Options
- Exclude from Export/Display
By default, every field is displayed on Form entries in the Data area and is included in non-templated exports (e.g., generic pdf, CSV, spreadsheet, database connectors).
Use this property to prevent this field from showing on all such displays and exports.